
Lesson 2 - Simple Calculator in C# .NET Windows Forms
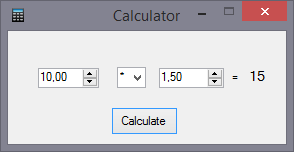
In the previous lesson, Introduction to Windows Forms applications, we introduced Windows Forms and created a window with a text label. In today's C# .NET tutorial, we're going to take a look at events and create a simple calculator. It'll look like this:
Form preparation
Create a new Windows Forms project named Calculator. We'll
rename the form to CalculatorForm. We usually start our
applications with form design. From the Toolbox, we'll drag a few controls into
it. We're going to need:
- 2x
Label - 1x
Button - 2x
NumericUpDown - 1x
ComboBox
Label
We already know the Label, it's simply a text label.
If we don't use a control in the code, we don't have to name it. If we do, we
should set the Name property of it (in the Properties window, the
property name is in parentheses (Name)), then we'll be able to access this
control using this name. I recommend switching the properties from the
categorized view to alphabetical order (first 2 icons in the Properties window),
you'll find properties faster. Name is the name of the control,
Text is what is written on the control. This logically implies that
we can have multiple controls with the same text on a form, but they have to
have different names.
One label will only serve as a label with the text "=", so let's
set it. The second Label will be used for displaying the result, and since we
want to enter the value into it programmatically, we'll set its
Name property to resultLabel. We'll set the text to
"0". We can also increase the font to 10.
Button
The button is simply a button that calls a method (more precisely, an event)
when clicked. In this case, we'll name this button as
calculateButton and we set its Text to
"Calculate". We'll assign the event to the button later.
NumericUpDown
NumericUpDown is the first control for entering a value we're
going to introduce. By default, we can only enter an integer in it. We can
change this behavior by setting the DecimalPlaces property, which
specifies the number of decimal places. We'll set this value to 2
for both controls we put in our form. We also set their Minimum and
Maximum properties. In our case, the minimum should be some low
value and the maximum some high value, let's say -1000000 and
1000000. To use the maximum values of a given data type, we'd have
to set the limits in the form code using the MaxValue and
MinValue properties of the respective data type.
The advantage of entering numbers using this control is that the user isn't
able to enter any nonsense value. If we parsed the number from a
TextBox (which we'll show you in the next lessons), our application
might crash when it gets an invalid value. It's always easier to choose the
right control than to check the user's input.
We'll name the controls as number1NumericUpDown and
number2NumericUpDown. Note that the name should always contain the
control type. For example, we can have both ageLabel and
ageNumericUpDown, where ageLabel is the label of the
age field, and ageNumericUpDown is the field. Moreover, it makes
easier to orientate in the code. Sometimes names as numberNmr,
calculateBtn, etc. are used as well.
ComboBox
We're almost there. ComboBox is a drop-down list with several
predefined items. The items can be either added in the designer or specified in
the code, even while the program is running. This applies to all controls - all
their properties from the designer can also be set in the code. However, some
advanced properties can only be set from the code and aren't present in the
designer.
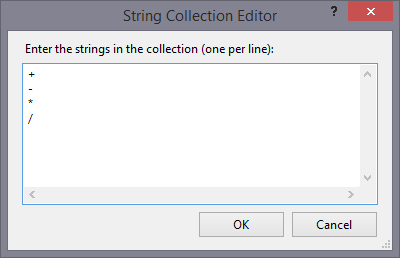
We'll name the control operationComboBox and then click the
"..." button in the Items property. Inside the newly opened window,
we'll list the options that can be selected in the comboBox. We write each
option on a separated line. In our case, those options are +,
-, *, /.
The items don't have to be strings, we can pass objects as well. We'll show this later.
Unfortunately, the selected item can only be set from the code.
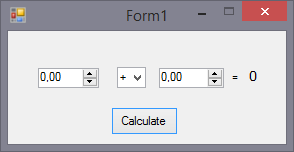
We'll arrange the controls on the form as shown at the beginning of this lesson.
Form code
We'll move to the source code of the form. We already know we do this by pressing Ctrl + Alt + 0 or by right-clicking on the form and selecting View Code.
Inside the form constructor, below the InitializeComponents()
method call, we'll set the selected item of the operationComboBox.
To do this, we'll set the SelectedIndex property to 0,
thus the first item:
public CalculatorForm()
{
    InitializeComponent();
    operationComboBox.SelectedIndex = 0;
}
Of course, we can access all the form's items from the form.
Into the constructor, we write the code that should be executed right after the form is created. When you run the app, adding will be selected as the operation:
Event handler
Now all we have to do is to respond to the button's click event. We'll move back from the code to the form again, then we'll double-click the button. A new method will be automatically added into the code:
private void calculateButton_Click(object sender, EventArgs e)
{

}
If you've read the C# .NET object-oriented tutorial,
the method header should remind you of EventHandler. In the
CalculatorForm.Designer.cs file, we can find code that assigns this
method to the button's event. In case you don't understand the previous
sentences, it doesn't mind at all. All you need to know is this method is called
when the button is clicked.
Let's go back to the designer (Shift + F7) to select the button. In the Properties window, we can switch between properties and events using the buttons highlighted in red below:
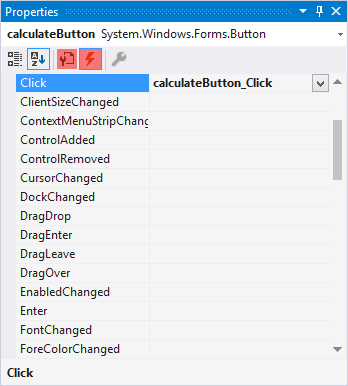
Here we see our Click event. This is the place from which we're
able to remove it or add it again. Some controls have special events for which
we can generate methods from here.
Never delete events just by removing the handler method from the code. The designer would stop working, and you'd have to fix its file (specifically, remove the assignment of a no longer existent method to the event). The only correct way is to use the designer.
Calculation
Let's move to the calculation itself. The code won't be complicated at all.
We'll simply just use conditions for the operationComboBox items
and calculate the result inside the event handler of the button accordingly.
Then we'll set the result as the text of resultLabel. We shouldn't
forget to handle division by zero.
The event handling method's code may look like this:
private void calculateButton_Click(object sender, EventArgs e)
{
    // variables setup
    string operation = operationComboBox.SelectedItem.ToString();
    double number1 = Convert.ToDouble(number1NumericUpDown.Value);
    double number2 = Convert.ToDouble(number2NumericUpDown.Value);
    double result = 0;

    // calculation
    if (operation == "+")
        result = number1 + number2;
    else if (operation == "-")
        result = number1 - number2;
    else if (operation == "*")
        result = number1 * number2;
    else if (operation == "/")
    {
        if (number2 != 0)
            result = number1 / number2;
        else
            MessageBox.Show("You can't divide by zero");
    }
    resultLabel.Text = result.ToString();
}
First, we store the values from the controls in variables to make the code
more readable. We access the selected comboBox item using the
SelectedItem property, which is of the object type.
This means we have to convert it to string in our case. Similarly,
we could also use just the item index using SelectedIndex. Since
NumericUpDown returns the value in its Value property
which is of the decimal type, we must convert it to the
double type using the Convert class.
For the case of zero divisor, we display a MessageBox using the
static class of the same name and calling the Show() method.
Finally, we display the result in resultLabel. Unlike the console,
where we could simply print the numbers, we must first convert the numbers to
string here.
You can also set the Icon property of the form (by selecting the
icon file), Text to "Calculator" and StartPosition to
CenterScreen. Like this, the form will be created in the center of
the screen. If we set FormBorderStyle to FixedSingle,
the form can't be resized, which fits our application. We can also disable
window maximization using the MaximizeBox property.
The code is available in the article's attachment as always. In the next lesson, Birthday Reminder - Designing Forms, we'll create a more complex app using multiple forms - a birthday reminder.
Did you have a problem with anything? Download the sample application below and compare it with your project, you will find the error easily.
Download
By downloading the following file, you agree to the license terms
Downloaded 284x (329.7 kB)
Application includes source codes in language C#

 David learned IT at the Unicorn University - a prestigious college providing education on IT and economics.