
Lesson 1 - Introduction to Node.js
Welcome to the first lesson of an online course about creating web applications in the Node.js JavaScript runtime. In today's tutorial, we're going to introduce and install the environment. Finally, we'll try to write our first Node.js application.
Introduction to Node.js
Node.js is an environment able to run JavaScript code outside the web browser. It's built on the Chrome V8 JavaScript engine, so the basis of this JS environment is the same as in the Google Chrome web browser. It's important to mention that although you can write many things in this environment, its design and primary purpose is to create the server-side of web applications. This is what e.g. the PHP language is also for and therefore shares the same purpose with Node.js. Thanks to this environment, JavaScript can be used on the server and not only on the other end, at the client. However, unlike e.g. PHP, Node.js emphasizes high scalability, the ability to serve many connected clients at once. Because of this feature and high performance, Node.js is now very popular for creating API servers for client single-page applications also in JavaScript. We'll explain why Node.js is so powerful later when we'll be describing its architecture.
Tools needed for developing in Node.js
As first, before we even begin the installation, we'll certainly be interested in what we need to work with Node.js.
Knowledge
Since we'll be creating a web application, you should have an idea of how such applications work and understand the HTTP protocol. You have also already noticed that we'll be using JavaScript as the programming language. And that means mostly pure JavaScript plus some of the Node.js libraries, so for example, jQuery is not what we'll use. Since we'll have the latest Node.js version installed on our server, we can feel free use the latest ES6 syntax of the "new" version of JavaScript.
Tools
Apart from installed Node.js, I recommend using a reasonable IDE. This will generally make your work easier when writing JS code. I personally use WebStorm, but I also have good experience with well known NetBeans.
Installation
Now when we have everything that we need, let's install Node.js together.
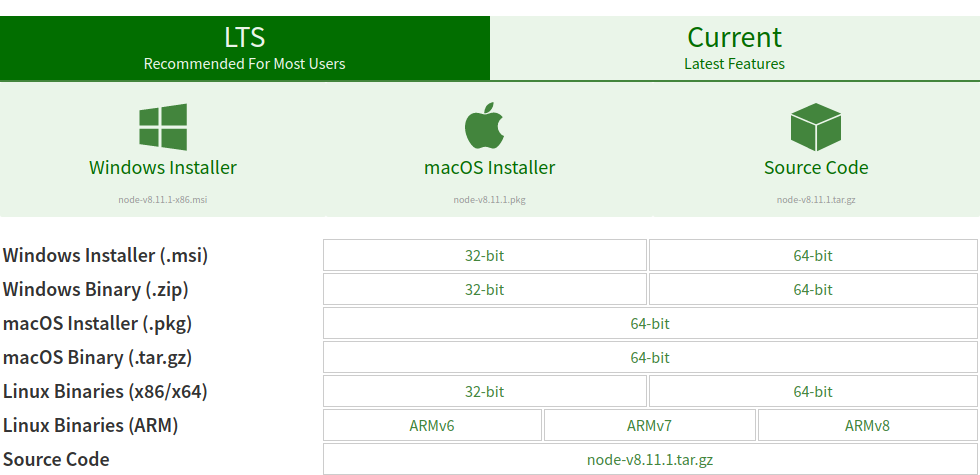
It's very simple. We'll go to the official Node.js
site or to the download section
(see the picture) and download the installer for our operating system. Then run
and install it according to the instructions. I'm sure you've done countless
installations like this 
While you are installing, let's make a little introduction to the architecture of this technology.
Architecture
The core of the entire Node.js consists of an event loop. All user requests enter it as events, which are then assigned to individual independent threads. Here, one image is worth a thousand words:
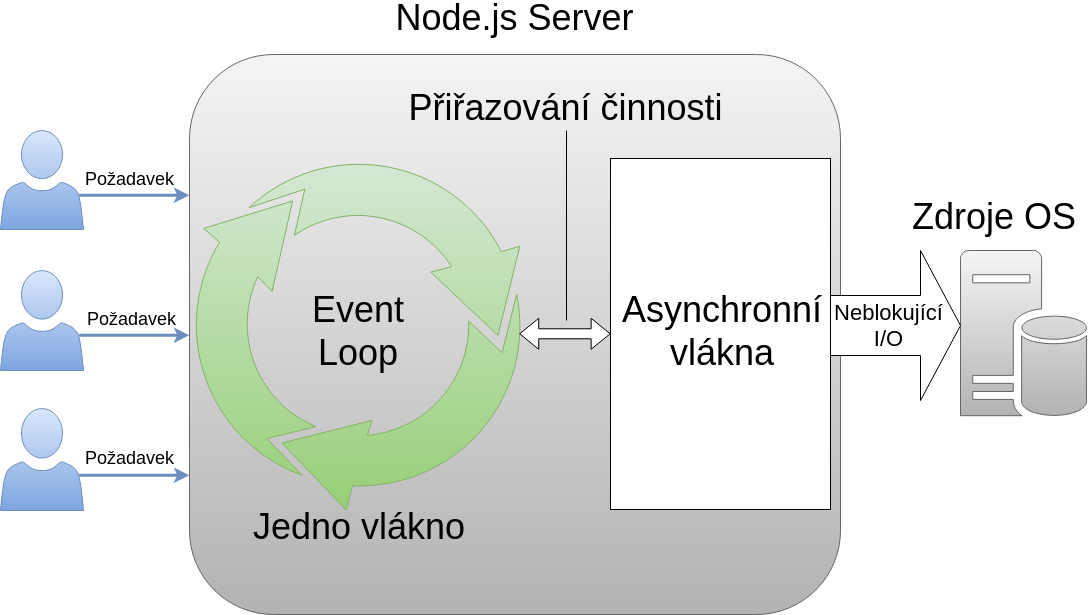
Other operations, such as manipulating operating system resources, reading a
file or working with a database, are then handled by events as well
(non-blocking I/O). Their are logically called in the event loop as well. This
means that this event loop controls practically everything. It's a simple but
highly effective solution, especially for web applications with many user
requests. JavaScript fits into all this nicely because JS callbacks natively
represent these events
The npm Package System
Hand in hand with Node.js goes the npm packaging ecosystem. It's part of the standard Node.js installation, so you already have it available. It's controlled by the command line or from the IDE.
It's no news that most programming languages have their own library manager, and in the JavaScript world it's npm. You can install and manage dependencies in your projects with it but also share and distribute your JS code. Now we're not just talking about Node.js libraries. Npm claims to be one of the largest package managers ever and currently contains around 650,000 packages. You'll find there packages with tools such as Grunt, Bower, or Gulp, as well as popular frameworks such as jQuery, React, or AngularJS.
We'll certainly use it in our project when we want to install the necessary libraries, e.g., for working with a database. It's important to note that Node.js also has several built-in modules, primarily focused on developing web applications. You can find their list in the Node.js API. Since this course is about Node.js, I'll try to use these built-in modules primarily rather than installing any external ones.
The http Module
Node.js does not run within any web server, but we run the webserver directly from the code within our script. There's a built-in http module for this purpose, which then gives us full control over the HTTP communication of this server. It's important to realize that this module doesn't provide any automation, so we must ensure we meet all the requirements of the HTTP protocol, such as headers, ourselves. It'd be best to show a simple example.
Our First Application
Let's now try to write a simple web application in Node.js. Because we'll
need to communicate with it somehow, we'll use the http module. And what is more
appropriate than the proven "Hello World"? So, let's create a new project with
an index.js file in it containing the following code:
const http = require('http');

const hostname = '127.0.0.1';
const port = 3000;

const server = http.createServer((request, response) => {
              response.statusCode = 200;
              response.setHeader('Content-Type', 'text/plain');
              response.end('Hello World!');
});

server.listen(port, hostname, () => {
              console.log(`Server running at http://${hostname}:${port}/`);
});
First, we load the http module. Using it, we create a server with a callback that will be called to process individual client requests within the event loop we mentioned above. In this callback, based on the clients' requests, we then send an appropriate response that meets the requirements of the HTTP protocol. You may have read from the code that we send them the text "Hello World." Finally, we start our server at the appropriate address and port, which is followed by a callback printing an informative message to let us know that the server is already running.
Launching
Now we need to run our script in the Node.js environment. We do this either
from the IDE or by using a simple command from the command
line, where we'll see the output as well. If you are executing the
command from the command line, you must be in the same folder as
index.js or enter the full path to it:
node index.js
Server running at http://127.0.0.1:3000/
So our server is now running. When we open the web browser and go to its address to make a request, we get the answer:
That’s all from today’s opening tutorial. Next time, in the lesson REST API, SOAP, GRAPH, and JSON, we'll explore different types of application interfaces to create more exciting web applications.
